|
|
|
|
Recording
Drum
|
||
|
Thanks to Home
Recording Home page
|
||
|
Recording Drums Part 1 Dateline: 07/15/97 Last week we covered how to record a Horn Section. This week we'll get into one of the hardest instruments to record. Recording drums is probably the most challenging situation you will ever come across in the studio. What mics you use and how you place them is important, but some initial preparation will help you get great drum sounds and really lay a nice foundation for your track. In major recording centers like Los Angeles and Nashville, having a tuned kit with new heads is the standard operating procedure for all the first call studio drummers. They have full time drum techs who cart their drums around, change the heads and tune them before each session. However, if you're working in the other 99% of the country, you as an engineer might have to take responsibility for making some of those things happen. When I'm doing the pre-production meeting for a session (which can be as simple as a phone call), I always tell the band and drummer that if you want this record to sound great, put new strings on the guitars and new heads on the drums (tuning an acoustic piano is also a must). No amount of EQ or signal processing can resurrect a cardboard sounding drum kit after it's recorded. You must have a good sounding kit up front and it must be tuned. I found a great tool for helping me tune drums with the Drum Dial. It's featured under product of the month, it's worth checking out. The Environment Something you need to assess and be aware of is the room you're recording in. Not only are you recording the drums but you're recording the space that they're contained in. A room that has acoustical problems such as standing waves and ugly uneven reflections can ruin the best sounding kit. If you are stuck recording in a poor room you may have to put up some packing blankets or use gobos to help you tame down the room. Now that we've established the importance of having a good sounding kit and room, the next step is to get it on tape (or hard drive). Making a drum kit sound like one organic unit is always my objective. For starters, stand in the room as the drummer plays and actually hear what the kit sounds like in that space. Then try to emulate that as much as possible. Because of the number of mics used in recording a kit, you could run into the problem of it sounding too much like a collection of separate drums. You want it to sound more like a whole instrument rather than a group of individuals. Next week will be covering the choice of microphones for the drum kit. Recording Drums Part 2 Dateline: 07/22/97 Last week we discussed the importance of a good sounding drum kit and a room in which to record it. We're now ready to talk about the microphones we'll need to get the job done. Every engineer has his/her own favorite mics that have gotten the job done. I'm going to give you a number of options that I have tried and that have worked for me. Kick drum: You need a mic that will handle the high SPL of a kick and also cover the low end as far as frequency response goes. Some choices are:
Snare drum:
I've tried a number of others but still keep coming back to this simple, inexpensive mic. I love it. Another option is to use a second mic on the underside of the snare drum. This can be another 57 or perhaps another dynamic mic like the Beta 57. If you have a condenser that can take the SPL then by all means try it. The idea of this mic is to accentuate the sound of the snares on the underside of the drum. Mixed with the top mic it can give you the snap that you need and aren't getting from the top of the drum. Hi-Hat:
Toms:
Overheads and room mics:
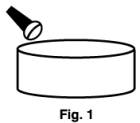
Basically any matched pair of condensers will work here if you're stuck, for the most part you'll want a cardioid pattern for the overheads and you can experiment with the room mics. These mic choices are just guidelines. You may have your own favorites or want to try others. The important thing is to get the killer sound that you need to make your track a standout. Next week will be covering microphone placement for all the different drums. Recording Drums Part 3 Dateline: 07/29/97 Last week we picked a number of mics that would be good for specific drums in a drum kit and as overheads. Now we'll discuss specific placement strategies. Kick drum: The best scenario is to have the mic inside the kick drum. You'll never get great beater definition and isolation if the mic is outside the front head. I've heard of guys miking the outside of the front head and then miking the beater side. I've tried this and it was a nightmare of leakage and didn't work for me. I like to put the mic inside the drum. This can be accomplished by taking off the front head or if there's a hole in the head, putting the mic through and positioning it inside. If the head is all the way off then you must build a little isolation "house" around the outside of the front of the kick. A chair, some duct tape and a packing blanket or two will work nicely for this. This will help isolate the drum and your mic. In addition you may need to put a blanket or a pillow inside the drum to deaden the inside a bit. A kick that's too live will give you little definition and can be ugly. DW Drums makes a nice hourglass shaped pillow that is cheap and works great. I place the mic a little more than half way into the drum and point it just to one side of the beater. I've seen others put it more off axis to the beater head depending on what the drum sounded like. You'll have to experiment and see what's right for your particular situation. I recently talked Robert Scovill about how he miked Neal Peart's kicks for the most recent RUSH tour. He came up with a home rigged mic assembly for the inside of a kick that has the front head on it. He criss-crossed some cables that he rigged on the inside of the kick and fixed a mic clip to it at the center. He used turnbuckles to get the mic clip placed precisely where he wanted it. Once he fixed the mic inside he closed up the outer head. The cable came right out of the drum and could be sent to the snake easily. Kind of a cool solution I thought. Snare drum: Snare is miked as in Fig. 1. About 2-3 inches off the head and pointed in from the side. This keeps the mic out of the drummers way and vice versa.
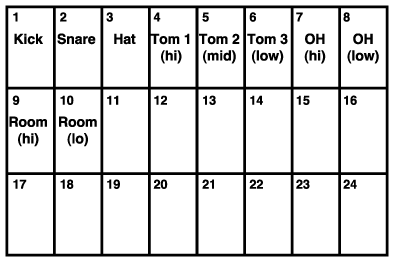
Toms: Tom miking is very much like the snare in Fig 1. In addition sometimes if I'm not getting enough low end from my low tom I'll put a condenser or a D-112 underneath the bottom head. This is then mixed in with the top mic, and after checking for phase, it's sent to a track on the tape machine. Hi-Hat: There are a number of different scenarios for hi-hat miking. The desire is to keep the other drums out of the hat mic as much as possible. I've seen it pointed away from the drummer and down at the outer edge of the hat from the top. You have to watch that the mike isn't pointed at the bell because it will sound very pingy and thin. In addition don't get too close to the closing edge because a puff of air comes out every time the hats close and that can ruffle your diaphragm and make for nasties on tape. Overheads and Room mics: Overheads can be placed in an x-y configuration or in a spaced pair. (see the feature on mic placement) If you use omni patterned mics then the spaced pair is the way to go. Large diaphragm condensers tend to work better in spaced pairs also. Small diaphragm mics work great in either miking scenario. In general I put the mics about 6 to 7 feet from the floor and if spacing them try to capture a balanced sound from all cymbals and toms. Room mics can be placed equidistant from the front of the kit and back. How far back and how wide you place them will determine how big your room mics sound. Remember that for every foot you add one millisecond of time delay from the source. So if your room mics are back 10 feet you're mics will have a delay of about 10 milliseconds. The best rule is to experiment and see what you get and if it pleases you and compliments the music then go for it. I always print room mics separately. Once again these are just guidelines. A lot of people have different techniques and you should make yourself aware of as many as possible and try them for yourself. Next week will be covering eq for these drums and how to arrange a track sheet for a session. Recording Drums Part 4 Dateline: 08/05/97 Last week we picked a number of mics that would be good for specific drums in a drum kit and as overheads. Now we'll discuss specific placement strategies. Track Sheet Layout How you lay out your track sheet depends greatly on how many tracks you can afford to dedicate to your kit. The best scenario is total isolation of all drums. I like to dedicate a track to each tom also but you can afford to sum these to stereo if you're stuck. The reason for all the isolation of course is to be able to treat each individual drum with, EQ, panning and reverb. Once you sum drums to stereo you'll not have the flexibility necessary to do this. (see August '97 Question of the Month). So for our purposes let's say you have 24 tracks available. Below is an often used layout for drums within this framework.
Notice the extra info as far as panning and which side of the kit the drums are from. Very important info for the next engineer down the line. You might also include what mic you used. As far as EQ goes, I've said in the past that EQ is the LAST thing you should do to make something sound better. Mic placement and choice is your first refuge when things are not sounding good. Also keep in mind that new heads and tuning goes a long way in making a drum kit sound great. (keep your eye here for an in depth feature on drum tuning) In light of that here's some general EQ I use when tracking. Kick drum:
Snare drum:
Hi-Hat:
Toms:
Overheads:
This is all very subjective and depends on the kit you're recording. So it's NOT gospel just meant as a guideline. I never gate to tape always on the rebound and I always EQ to tape especially if analog. Everyone has their own particular style of recording. This is mine. You will be a better rounded engineer by getting a lot of different perspectives on recording and taking what you like out of that. This will develop you're own style. I'd like to hear from you. Take a moment to write me and let me know how you feel about the content and links. If you'd like to receive the exclusive Home Recording site newsletter, please send me an email at homerecording.guide@miningco.com . The Home Recording site newsletter will include information on upcoming site events, features, polls and highlight issues of interest. The newsletter will be delivered to you on Tuesday of each week.
|